In “Sharing the knowledge” our experts share details about different subjects in InfoSec that we feel like could be worth the attention and helpful in public. This time our Azure AD -expert Ville Koch tells us about how Privileged Identitiy Management (PIM) for groups can be used in on-premises Active Directory..
Project design and determination of frameworks
Azure AD Group Writeback and PIM for Groups adds the possibility to assign high privileges in on-premises Active Directory environments for a limited timeframe and the possibility to add an approval process for such assignments. This aids in limiting the amount of highly privileged domain accounts and therefore minimizing the attack surface in such environments.
Introduction
Azure AD Privileged Identity Management brings with it the nice possibility to add members to highly privileged roles only temporarily (i.e., for a specific time frame) and that someone has to approve the assignment on activation.
Such a feature was for on-premises AD only possible using 3rd party software (Privileged Access Management solutions) or using something self-developed (e.g., automated using scripting). That’s why often companies did not bother using it, because it was either too expensive or resources were missing to implement and manage such a complex solution.
Now with more and more companies however having the Azure Premium licenses, there are two new features called “Azure AD Connect group writeback” and “Privileged Identity Management (PIM) for Groups”, which make this a whole lot easier:
- Azure AD Connect group writeback: https://learn.microsoft.com/en-us/azure/active-directory/hybrid/connect/how-to-connect-group-writeback-v2
- PIM for Groups: https://learn.microsoft.com/en-us/azure/active-directory/privileged-identity-management/concept-pim-for-groups
Note: Since group writeback is currently (as of August 2023) in public preview, Microsoft does not recommend to use it in production quite yet:
The group writeback functionality is currently in Public Preview as we are collecting customer feedback and telemetry. Please refer to the limitations before you enable this functionality. You should not deploy the functionality to write back security groups in your production environment. We are planning to replace the AADConnect security group writeback functionality with the new Cloud Sync group writeback feature, and when this releases we will remove the AADConnect Group Writeback functionality. This does not impact M365 group writeback functionality, which will remain unchanged.
Source: https://learn.microsoft.com/en-us/azure/active-directory/hybrid/connect/how-to-connect-group-writeback-v2
Requirements
For the setup described in this blog post, you require:
- An Azure AD Premium P1 license (or higher)
- For Azure PIM eligible and/or time-bound assignments, P2 is required.
- An on-premises Active Directory environment which is connected via Azure AD connect service to an Azure AD tenant.
- Azure AD Connect service version 2.0.89.0 or later installed in an on-premises system which synchronizes the users & groups between the cloud and on-premises environment.
Demarcation
This blog post does not describe how you should create least privilege groups for your users in the domain. Instead, it focuses on how you can use Azure AD features to assign users to such groups for a limited period of time and add an approval process to it.
If you are interested in best practices about how to configure highly privileged accounts and their permissions, I would recommend reading the Microsoft Whitepaper “Mitigating Pass-the-Hash (PtH) Attacks and Other Credential Theft”, which can be found here: http://aka.ms/pth
Also, in this blog we assume you already have an Active Directory environment with an Azure AD Connect Service installed. The setup of the Azure AD connect service will not be described.
Step by Step Setup
Configuring Azure AD Connect Service
- The step-by-step setup is based on the following Microsoft documentation: https://learn.microsoft.com/en-us/azure/active-directory/hybrid/connect/how-to-connect-group-writeback-enable
Group writeback requires enabling both the original (UnifiedGroupWriteback) and new versions (GroupWritebackV2) of the feature.
- On your Azure AD connect service host, open an elevated PowerShell console.
- Import the ADSync module:
Import-Module ‘C:\Program Files\Microsoft Azure AD Sync\Bin\ADSync\ADSync.psd1’ - Verify that no sync jobs are running (e. g. using Get-ADSyncConnectorRunStatus) and disable the sync scheduler:
Set-ADSyncScheduler -SyncCycleEnabled $false - Enable the group writeback v2 feature for the tenant:
Set-ADSyncAADCompanyFeature -GroupWritebackV2 $true - Re-enable the sync scheduler:
Set-ADSyncScheduler -SyncCycleEnabled $true - On your Azure AD connect service host, open the Azure AD Connect wizard.
- Select Configure.
- Select Customize synchronization options, and then select Next.
- On the Connect to Azure AD page, enter your credentials. Select Next.
- On the Optional features page, verify that the options you previously configured are still selected.
- Select Group Writeback, and then select Next.
- On the Writeback page, select an Active Directory organizational unit (OU) to store objects that are synchronized from Microsoft 365 to your on-premises organization. To have a better group naming in the on-premises AD, you can set the flag Writeback Group Distinguished Name with cloud Display Name (Preview).
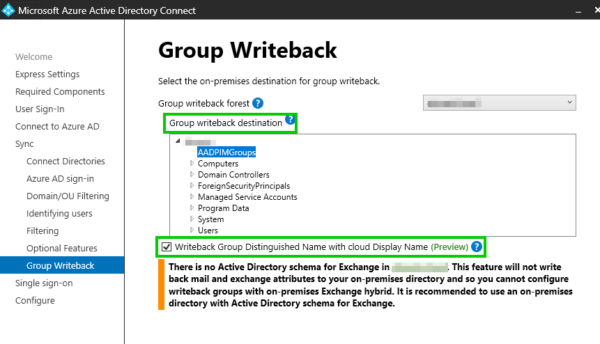
Select Next. - Provide on-premises Enterprise Admin
- On the Ready to configure page, select Configure.
- On the Configuration complete page, select Exit.
Configuring Azure AD Groups
By default, all M365 groups and Azure AD security groups are written back. To change the default behavior, follow the steps in the following Microsoft documentation:
- https://learn.microsoft.com/en-au/azure/active-directory/hybrid/how-to-connect-modify-group-writeback
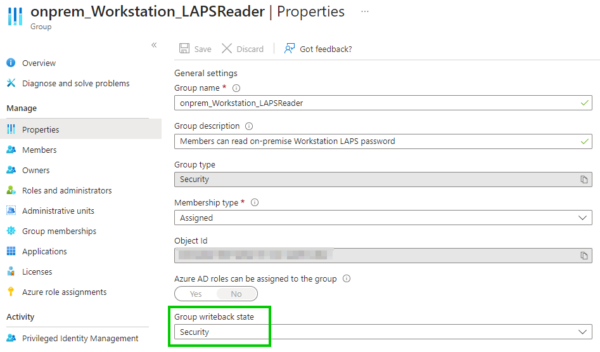
You can configure the writeback setting for each group in the properties:
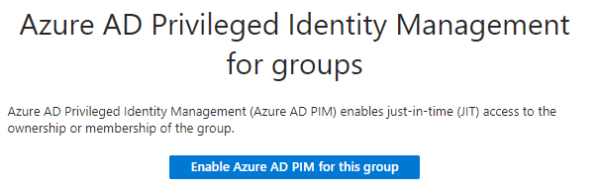
Once this is done, activate PIM for each group:
Managing Group Membership
There are different ways of how your users can be added to a group using PIM. Some best practices as an example:
- Using PIM Eligible Assignments, by choosing all eligible members upfront and specifying requirements for activation of the membership (e. g. MFA), maximum duration, approval requirement (e. g. specific user must approve every activation request) and notifications which are being sent when someone activates the assignment.
- In the Entra portal under Entitlement Management using Access packages, by specifying group membership as resource role and the activation / approval requirements using Policies.
It is better to not use static (permanent) assignments, since having assignments only temporary is basically the intention of using Azure AD PIM in the first way. Make sure to never assign highly privileged Azure AD users (e.g. Global Admins) to any group which is synchronized to the on-premises AD. Highly privileged Azure AD users should always remain cloud-only!
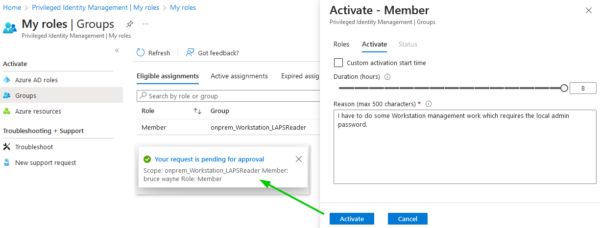
Eligible Membership Activation Request
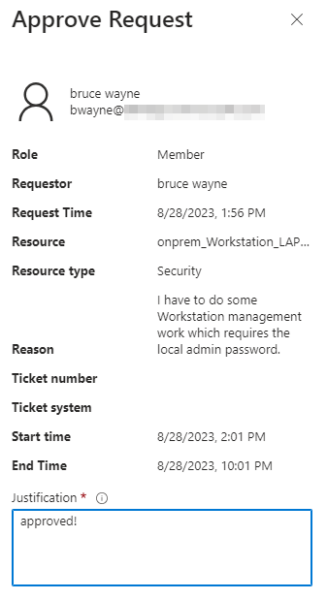
A user activates his eligible membership using the specified requirements, and an approval request is being sent to the specified approver:
The person configured for approving requests can then approve (or deny) the request:
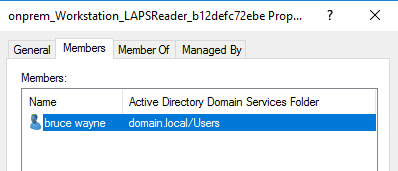
Once the next Azure AD Connect synchronization cycle has finished, the user is added to the on-premises AD group members:
Using the Groups in on-premises AD
You can now provide this group with the necessary permission in the on-premises environment.
One thing to mention: The groups synchronized from Azure AD are always Universal groups, which is why they cannot be added as members of Global groups (e. g. Domain Admins).
To provide permissions regarding the least privilege principle, check out the following MS documentation:
- https://learn.microsoft.com/en-us/windows-server/identity/ad-ds/plan/security-best-practices/best-practices-for-securing-active-directory
Limitations
- As previously mentioned, the groups which are written back to the on-premises AD are always Universal Groups which is why those cannot be added as members to Global Groups in the on-premises AD.
- Group Writeback only supports writing back groups to a single Organization Unit (OU). Once the feature is enabled, you can’t change the OU you selected.
- Groups being written back from Azure AD to on-premises AD will have a source of authority of the cloud. This means any changes made on-premises to groups that are written back from Azure AD will be overwritten on the next sync cycle.
- Group Writeback does not support writeback of nested group members that have a scope of Domain local in AD, since Azure AD security groups are written back with scope Universal. If you have a nested group like this, you’ll see an export error in Azure AD Connect with the message “A universal group cannot have a local group as a member.” The resolution is to remove the member with scope Domain local from the Azure AD group or update the nested group member scope in AD to Global or Universal